The Sitecore Rich Text Editor comes with many customization opportunities, however the most common change made to the RTE is the addition of CSS classes in the dropdown and making the text styles in the editor itself look like the front-end site. Read on to learn how to style the text in the RTE and add CSS classes.
Customize the RTE Text Style
The RTE by default has some very basic text styles that you can override to match the look and feel of your front-end site. First, its important to know that the RTE style comes from a CSS file configured via the web.config:
[xml]
<!– WEB SITE STYLESHEET
CSS file for HTML content of Sitecore database.
The file pointed to by WebStylesheet setting is automatically included in Html and Rich Text fields.
By using it, you can make the content of HTML fields look the same as the actual Web Site
–>
<setting name="WebStylesheet" value="/default.css" />
[/xml]
You can simply patch in a change to this setting to set the file to your own custom RTE CSS file, like so:
[xml]
<configuration xmlns:patch="http://www.sitecore.net/xmlconfig/">
<sitecore>
<settings>
<setting name="WebStylesheet">
<patch:attribute name="value">/custom-rte.css</patch:attribute>
</setting>
</settings>
</sitecore>
</configuration>
[/xml]
Now you can edit your custom CSS file to make the basic text styles of it look like your site. I recommend the following edits to keep it clean and simple:
[xml]
body {
color: /* your style here */;
font-size: /* your style here */;
font-family: /* your style here */;
width: 100%;
height: 100%;
}
h1 {
/* your styles here */;
}
h2 {
/* your styles here */;
}
h3 {
/* your styles here */;
}
a {
color: /* your style here */;
}
ul {
/* your styles here */;
}
ol {
/* your styles here */;
}
li {
/* your styles here */;
}
[/xml]
Pro tip: cache bust the CSS any time you edit it
Since the CSS file is loaded into the browser in the <iframe> that the RTE uses, it will likely be cached easily. If you edit the CSS file you can easily add a dummy query string to cache bust the CSS file and force it to load a new copy from the server, e.g.
[xml]
<patch:attribute name="value">/custom-rte.css?v=2</patch:attribute>
[/xml]
Expose CSS Classes in the RTE
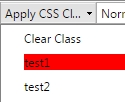
Now that you’ve made the text itself look nice like the front-end site, you may want to add a few helper CSS classes to the dropdown to help your editors. One approach is to add a CSS class to the custom RTE CSS file and apply your style properties to it. This will expose the class in the dropdown and when an editor uses it, it will actually apply the styles:

Another option is to apply an empty CSS class with no styles. This is useful for utility classes that might not have an appearance change in the RTE itself:
![]()
Once your classes are added to the CSS file, there are displayed in the dropdown in the RTE:

As you can see, once applied, they render thier style properties in the RTE as well:
![]()
![]()
Thanks for this clear explanation. Do you have some thoughts on including the CSS file that is actually used on the site? Do you know if there is a way to filter what classes are shown in the class-list versus what styles are applied to the rich text editor?
I tried the above approach to Expose CSS Classes in the RTE.However it does not work in Sitecore 8.Any idea?
Please ensure that the correct css is also referenced from your layout files which have a reference of default.css added by default.
Good article.
Do you know of any way to apply multiple css classes? I’ve tried multiple different syntax’es in default.css,
eg: btn & btn-primary:
.btn.btn-primary {} returns: btn-primary
.btn .btn-primary {} returns: btn-primary
.btn btn-primary {} returns: btn
I’m having the same issue with this type of button declaration with multiple classes. Any ideas how we can get this working?